
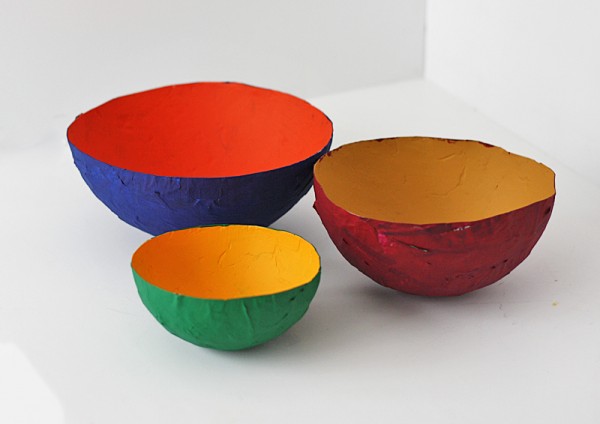
Quick answer: Inflate a balloon, cover its lower portion with at least five thin layers of paste-coated paper, let the shell dry completely, and then remove the balloon. Trim the opening and paint the finished form. The key is to leave the top of the balloon uncovered so the project forms a bowl rather than a sealed sphere.
This DIY Paper Mache Bowl Tutorial turns newspaper and flour paste into a lightweight container for dry craft supplies, wrapped candy, jewelry, or decorative objects. You do not need a perfectly smooth balloon or precisely measured strips. Careful layering and patient drying matter much more.
The finished bowl is an art object, not foodware. Flour-based paper mache readily absorbs moisture, so keep it away from liquids and do not place unwrapped food directly inside it. Ask Extension notes that paper mache can become soggy or mold when exposed to moisture and that any coating intended for food contact must specifically be food-safe and fully cured.
Materials and workspace setup
- One balloon
- Newspaper, plain packing paper, or other absorbent lightweight paper
- Flour
- Water
- A mixing bowl and spoon or whisk
- A cup, jar, or small bowl to support the balloon
- Scissors for trimming the dried rim
- Acrylic or other suitable craft paint, if desired
- Paintbrushes
- A washable table covering or scrap cardboard
- Optional pencil, ruler, and masking tape for planning the rim
Tear the paper rather than cutting every strip. Soft, feathered edges tend to overlap less visibly than crisp cut edges. Narrow strips also follow the balloon’s curve more easily. Pieces approximately 1 inch wide and several inches long are a convenient starting point, but use shorter pieces around sharply curved areas.
Cover the work surface before mixing the paste. Flour paste is easy to spread unintentionally, and a protected workspace lets you concentrate on keeping the layers thin. Children should have adult supervision when inflating or popping the balloon and when trimming the hardened shell.
DIY Paper Mache Bowl Tutorial: Step by step
1. Inflate and position the balloon
Inflate the balloon until its curved end matches the approximate width and depth you want. A larger balloon creates a broader bowl, while using only the bottom portion creates a shallower form. Avoid overinflating it, because a very taut balloon is more vulnerable to popping while you work.
Tie the balloon and place it knot-side down in a cup or other stable support. The exposed rounded end becomes the bottom and sides of the bowl. Decide where the opening should be and leave everything beyond that line uncovered.
For a more even rim, wrap a loose strip of masking tape around the balloon as a visual guide. Do not paste over the tape. A freehand boundary gives the bowl a more organic silhouette, which can also look intentional after trimming.
2. Mix a smooth flour-and-water paste
Start by mixing equal parts flour and water, as in the original version of this project. Treat that ratio as a starting point rather than a fixed formula: different flour and measuring methods can change the result. Whisk until the paste is smooth and spreadable. Add a little water if it remains too thick to coat the paper; add a little flour if it runs off like plain water.
The paste should wet a strip without leaving heavy lumps. Too much paste makes the shell slower to dry and encourages soft spots. Mix only as much as you expect to use during the session rather than storing leftover flour paste.
3. Apply the first thin layer
Dip one paper strip into the paste, coat both sides, and pull it between two fingers to remove the excess. Lay it across the balloon and smooth it down with your fingertips. The strip should look saturated but should not be buried beneath a thick film of paste.
Add strips one at a time, overlapping their edges so no gaps remain. Stop at the planned opening. SFMOMA’s papier-mâché activity likewise instructs makers to remove excess paste and build at least five thin layers, rather than relying on a few paste-heavy layers.
4. Build strength in alternating directions
Change the direction of the strips as you add each layer. If the first layer runs mainly from the future rim toward the bottom, place the next mostly around the circumference. Alternating directions distributes the joins and helps the finished shell behave as one structure.
Aim for at least five thin, complete layers for a small decorative bowl. A larger bowl or one intended to hold heavier dry objects may benefit from additional layers, especially around the base and rim. More material is not automatically better: ten soggy layers applied at once can dry less reliably than several controlled layers.
To keep track, alternate between newspaper and plain paper or change which printed section of the newspaper faces outward. The visible change makes it easier to see whether the entire form received another complete layer.
If the surface becomes very wet or starts sliding, stop and let it firm up before continuing. Museum art activities commonly incorporate drying between stages or layers, followed by painting only after the form has dried.
5. Let the shell dry completely
Leave the balloon in its support in a dry place with airflow around it. Do not place it against a radiator, use an open flame, or blast one area with intense heat. Uneven, aggressive heating can dry the outside before the material underneath and may distort the form.
An overnight wait is a useful minimum planning window and is the interval used in SFMOMA’s balloon activity, but the condition of the shell is more important than the clock. Humidity, paste quantity, paper thickness, and the number of layers all affect drying.
Before removing the balloon, inspect the bottom and the thick areas near overlaps. The shell should feel hard rather than flexible, with no dark, damp patches. A section that still feels cool or soft may contain moisture. Give it more time instead of hoping it will finish drying after the balloon is removed.
6. Remove the balloon and trim the rim
Once the shell is fully dry, make a small opening near the balloon’s knot and let the air escape gradually. Pull the deflated balloon away from the paper. If it clings, work slowly around the edge rather than yanking it from one point. Discard all balloon fragments immediately, especially when children or pets are present.
Draw a rim line with a pencil if you want a regular opening. Trim a little at a time with scissors, rotating the bowl as you work. Set the bowl on a flat surface occasionally to judge the silhouette from normal viewing height. A slightly uneven handmade rim is often less distracting than a smooth rim that tilts dramatically to one side.
If the edge feels weak after trimming, add one or two narrow paper strips around it, folding each strip over the edge so it reinforces both the inside and outside. Let that repair dry fully before painting.
7. Paint and decorate the bowl
Paint only after the bowl is completely dry. Use light coats so the paper does not become unnecessarily wet again. Let each coat dry before adding another, particularly if you are covering newspaper print with a pale color.
The curved form suits simple designs that tolerate small variations: broad stripes, dots, loose brush marks, color blocks, or a contrasting rim. If you want a planned pattern, sketch it lightly in pencil first. Painting the inside a lighter color can also make small stored objects easier to see.
An optional craft coating can protect painted decoration from routine handling, but follow the coating manufacturer’s application and curing directions. A decorative coating should not be assumed to make flour-based paper mache waterproof or suitable for direct food contact.
How to fix common paper mache bowl problems
The shell is soft after the balloon is removed
The likely causes are too few layers, excess paste, or incomplete drying. Support the bowl so it keeps its shape and allow it to dry longer. If it remains flimsy after it is dry, apply additional thin strips to the inside, alternating their direction and overlapping every edge.
The paper is wrinkling or sliding
Wipe more paste from each strip and use shorter pieces around the strongest curves. Smooth from the center of a strip toward its ends. If an entire layer shifts under your fingers, pause until the surface becomes firmer.
The bowl rocks on the table
A balloon naturally creates a rounded bottom. You can embrace that as part of the handmade shape or create a small foot. To make a foot, attach a ring of tightly rolled paper to the fully dried bottom with more paper strips. Check that the ring sits level, then let the added material dry before decorating it.
The rim is uneven
Set the bowl upright, rest a pencil on a stable stack of books, and rotate the bowl against the stationary pencil to mark a consistent height. Trim to that guide gradually. Reinforce the newly cut edge if trimming exposes thin or separated layers.
Drying is taking much longer than expected
Move the project to a space with better airflow and keep it supported so air can reach the pasted area. Thick ridges of paste and many wet layers slow the process. For future bowls, remove more paste from each strip and allow the work to firm between groups of layers.
A practical final checklist
- The bowl opening was left uncovered while layering.
- Every paper strip overlaps its neighbors.
- At least five thin layers cover the entire bowl form.
- Successive layers run in different directions.
- No area feels cool, damp, soft, or flexible before balloon removal.
- The rim is trimmed carefully and reinforced if necessary.
- Paint is applied only to a fully dry shell.
- The finished bowl is reserved for decorative use and dry storage.
Make the design your own
The strongest beginner result comes from thin layers, complete drying, and a clearly planned opening. Once those structural choices are handled, the bowl becomes a small three-dimensional canvas. Choose a limited color palette, repeat one simple motif, or let newspaper type remain visible beneath translucent decoration.
Use the finished piece for lightweight, dry objects rather than liquids or unwrapped food. If you enjoy turning simple materials into displayable art, a beginner embroidered hoop art project offers another approachable way to explore color, pattern, and handmade presentation.